up to date AKS Image SKU`s on AzureStack Hub, newer Versions of AKS-Engine and Kubernetes

keep my K8S up to date with Azure…

Disclaimer: use this at your own Risk

Recently I tried to deploy newer versions of Kubernetes using AKS Engine to my AzureStack hub, but i failed for some odd reasons. That made me thinking about how do get newer Versions deployed to my AzureStack Hub using aks-engine.

Why should you want a newer version at all? Well, the answer is fairly simple. With K8s dot releases essentially coming monthly, one want’s to stay current with Security fixes. Patching is not an option. I love the image based approach where i simply replace the OS Image. The longer a VM runs, the more vulnerable it get’s. Deleting a VM an rebuild with a new Image is by far the most convenient and secure approach. aks-egine does a pretty good job in upgrading to newer image versions…. if available.

The Problem

If you want to use your own Image, or try a newer AKS Engine release, the Deployment will try to download the missing Packages from https://kubernetesartifacts.azureedge.net/kubernetes/ and the according Docker Images from mcr.microsoft.com/oss/kubernetes/

This Process is most likely to fail for slow Networks, as the download scripts have timeouts of 60 seconds per package.

My First idea was to patch the deployment scripts. While looking at the Code on GitHub, i found it might be much more convenient to create updated aks base images and put them onto my AzureStack Marketplace.

The Current State

As of this Post, the “Official” Documented version of AKS-Engine for AzureStack Hub is v0.55.4.
This Version has Built In Support for Kubernetes up to 1.17.11

Preseeded deployments requires the Following Marketplace Images to be deployed:

	AzureStackAKSUbuntu1604OSImageConfig = AzureOSImageConfig{
		ImageOffer:     "aks",
		ImageSku:       "aks-engine-ubuntu-1604-202007",
		ImagePublisher: "microsoft-aks",
		ImageVersion:   "2020.09.14",
	}

The Images have the following K8S Version Pre-Seeded:

K8S_VERSIONS="
1.17.11-azs
1.17.9-azs
1.16.14-azs
1.16.13-azs
1.15.12-azs
1.15.11-azs
"

However, while reading the Release Notes for AKS-Engine on GitHub, i found newer versions exist with newer Image Support:

AKS Images

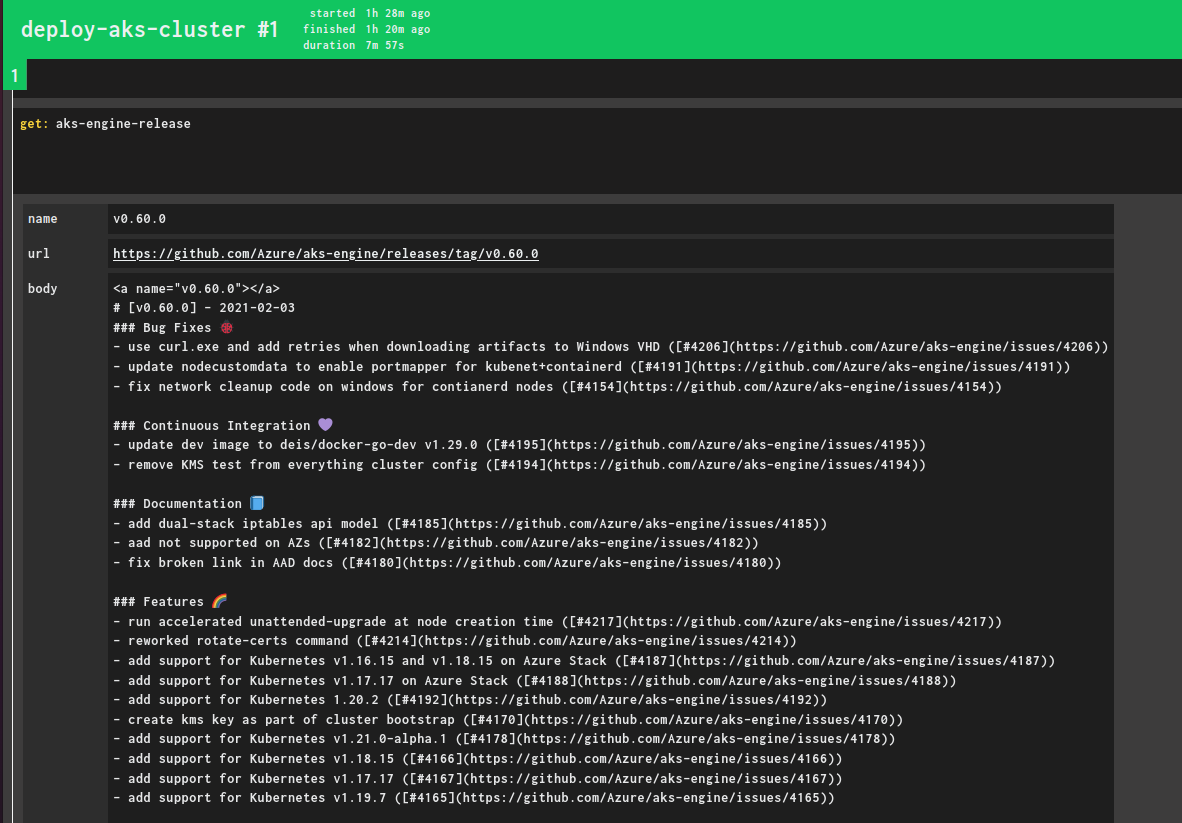
Yes, it says v0.60.0 would support up to K8S-AzS v1.18.15, but that is NOT in the current image.

This would require image 2021.01.28, as per chore: rev 2021.01.28

Building a new Image

While reading and Browsing the aks-engine GitHub releases, i found it would be a convenient way for me to create new microsoft-aks images using packer the way Microsoft does…
The Packer building Process used my microsoft is essentially an automated approach used in their Pipelines to create new Azure Images.
So why not just use this for AzureStackHub ( keep in mind, it’s like Azure )

As you can see from the Changelog, aks-engine has newer support for AzureStack Hub, however, aks-engine would complain about a missing aks sku version.

To create a newer image offer, we will use packer and the artifacts from the aks-engine GitHub repository.
But before we start, we will need to do some prerequisite.

In a Nutshell, the Process will deploy an Ubuntu Base VM in Azure along with a temporary resource group, pull all supported docker Containers for aks from mcr an pre-seed all software versions. Some hardening and updates will run, and once finished and cleaned up, a new image will be provided along with the SAS Url to download.

Requirements

I run the imaging process from an Ubuntu 18.04 Machine. you can use a VM, WSL2 or any Linux host / Docker Image.

Install the following Packages:

  • Packer from https://www.packer.io/downloads
  • make utils ( sudo apt install make )
  • git ( sudo apt install git)
  • an Azure account ( the images will be created in Public Azure)

We also would need an Azure Service Principal in an Azure Subscription, as the build process runs in Azure.

Creating a v0.60.0 Compliant image

First of all, use git to clone into the aks-engine repo

git clone git@github.com:Azure/aks-engine.git
cd aks-engine

every release of aks sitś in a new bracnch to get a list of all released versions of aks-engine, simply type

git branch -r| grep release

as we want to create a v0.60.0 compliant image, we checkout the corresponding release branch:

git checkout release-v0.60.0

for the packer process, microsoft automatically creates a settings.json file. to pass required parameters for the file, we export some shell variables for the init process:
(Replace ARM Parameters with your values)

export SUBSCRIPTION_ID=<ARM_SUBSCRIPTION_ID>
export TENANT_ID=<ARM_TENANT_ID>
export CLIENT_SECRET=<ARM_CLIENT_SECRET>
export CLIENT_ID=<ARM_CLIENT_ID>
export AZURE_RESOURCE_GROUP_NAME=packer ( an existing resource group ) 
export AZURE_VM_SIZE=Standard_F4
export AZURE_LOCATION=germanywestcentral
export UBUNTU_SKU=16.04

once those variables are set, we can run the initialization of the Environment.

first, we connect programmatic to the azure environment with make az-login

make  az-login

if the login is successful, you SP and Credentials worked.

We can now use the make init-packer command to initialize the Packer Environment (e.g. create the storage account)

make init-packer
init packer

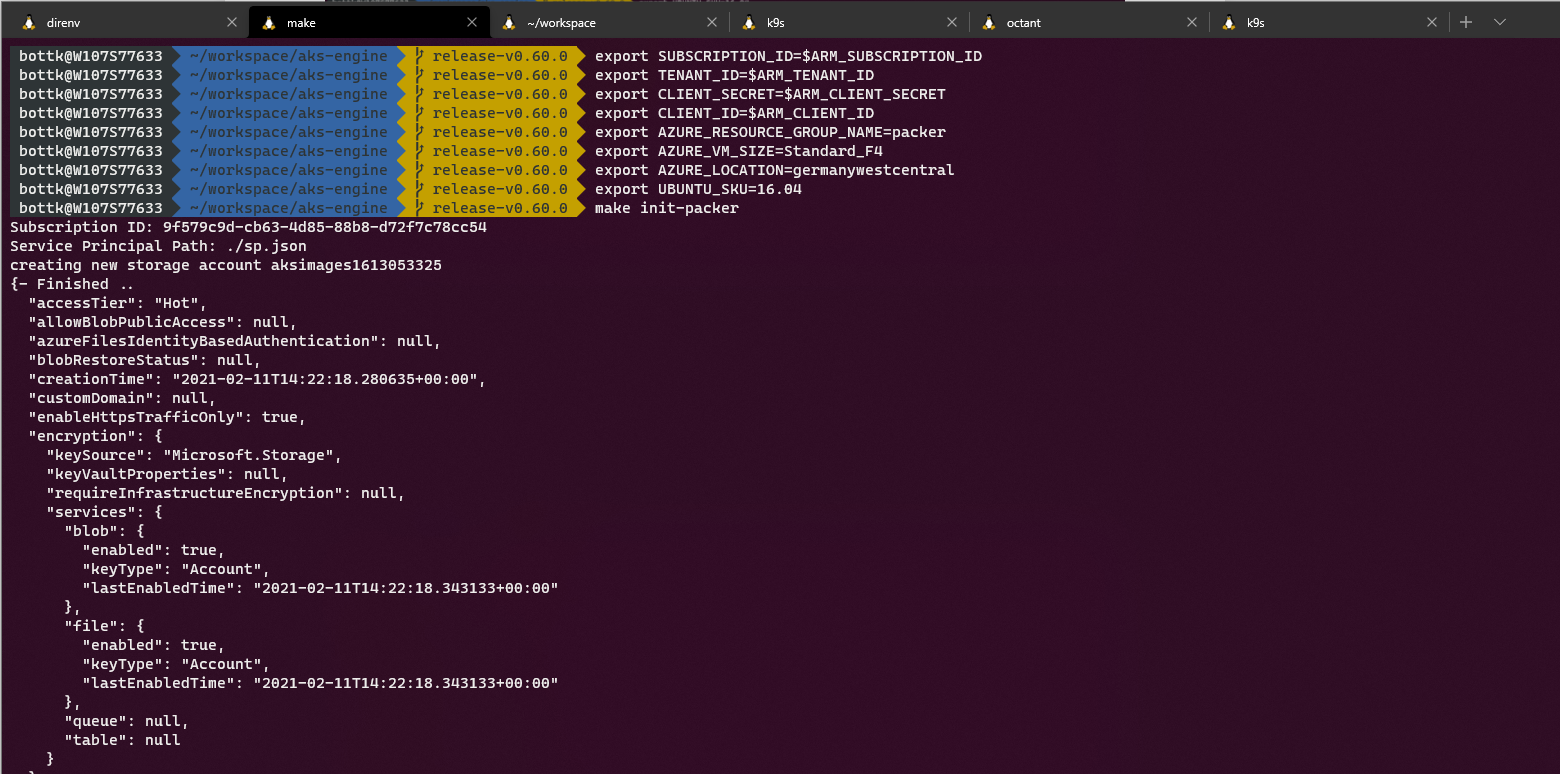
*note: i skipped the az-login in the picture above as it shows credentials :-)

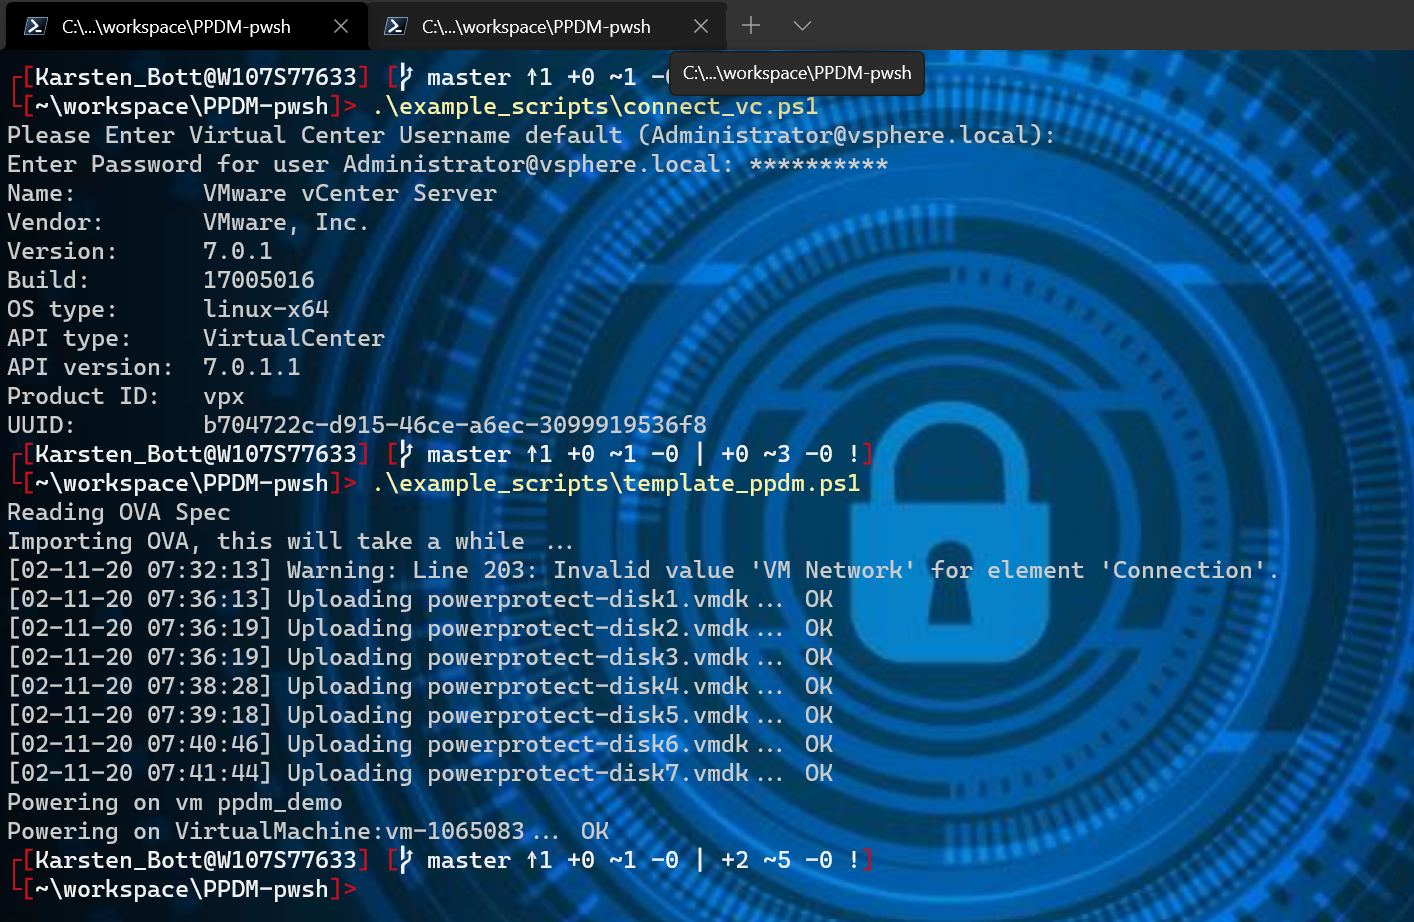
once done with the init process, we can start to build our image.

make build-packer
build-packer

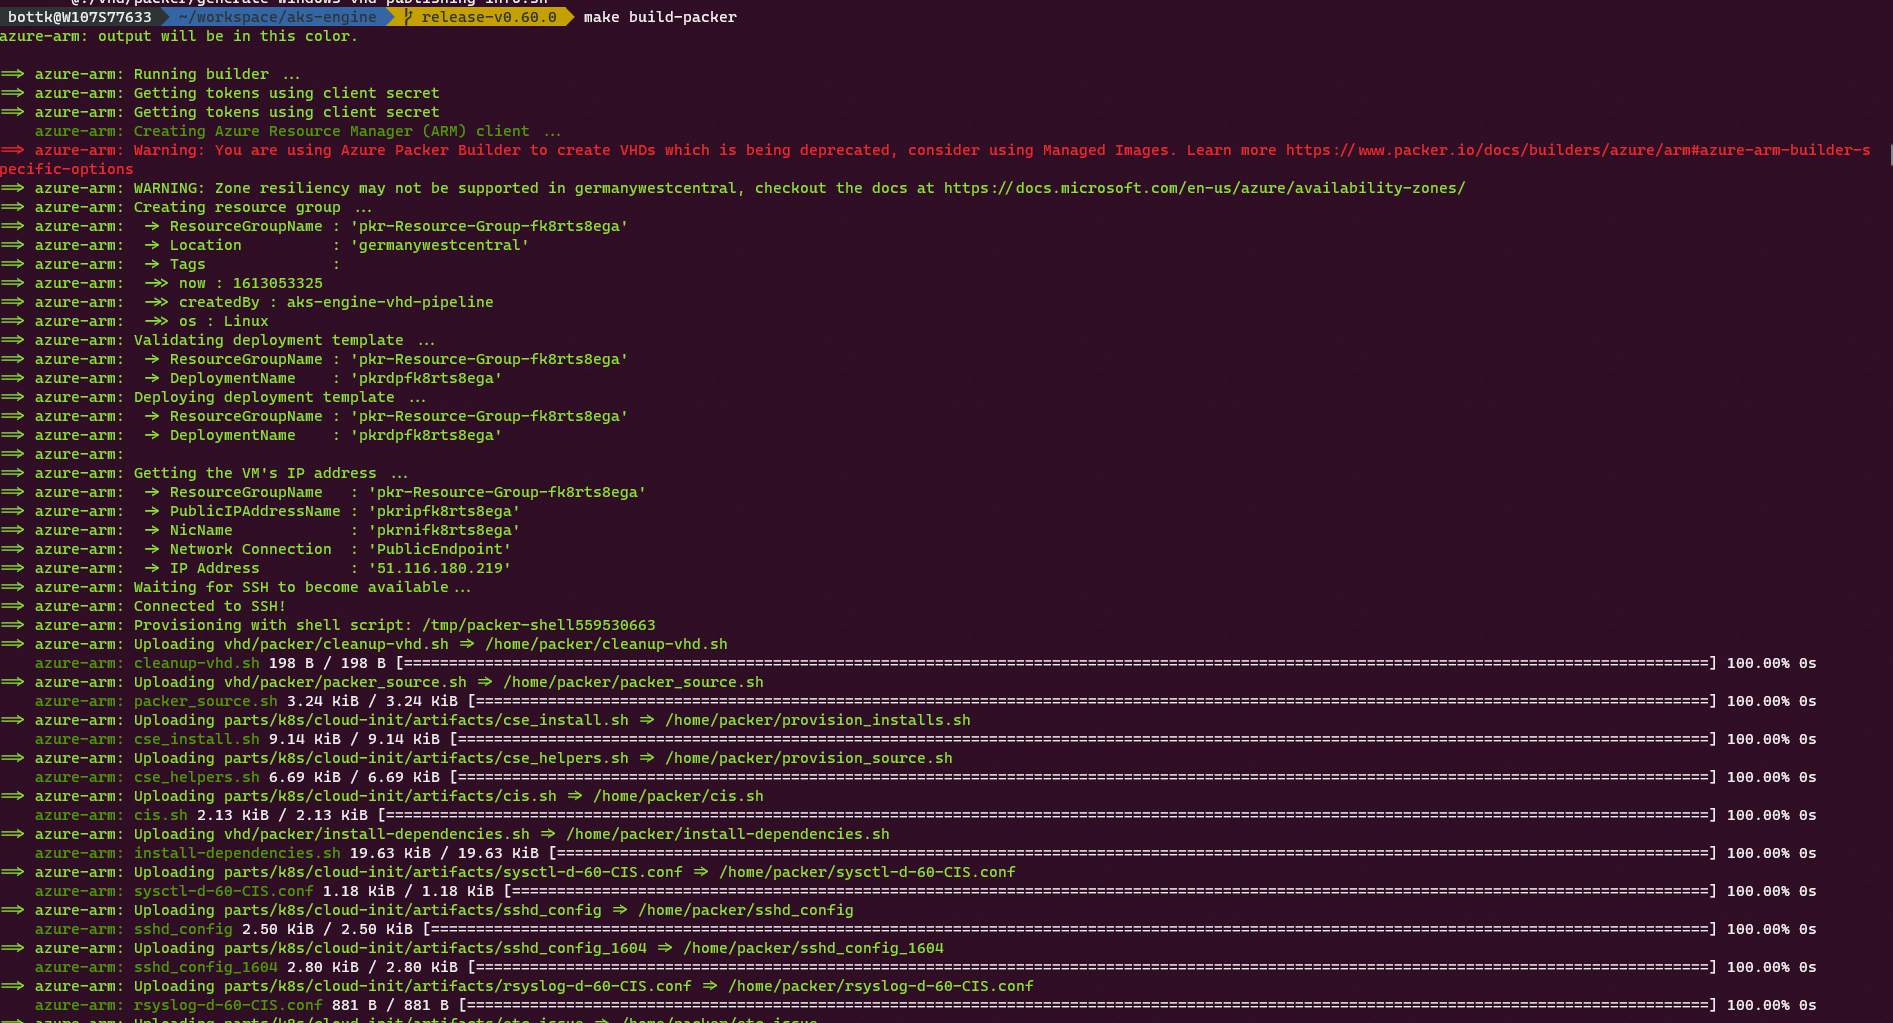
Sit back and relax , the Process will take
a good amount of time as a lot of stuff will be seeded into the image.

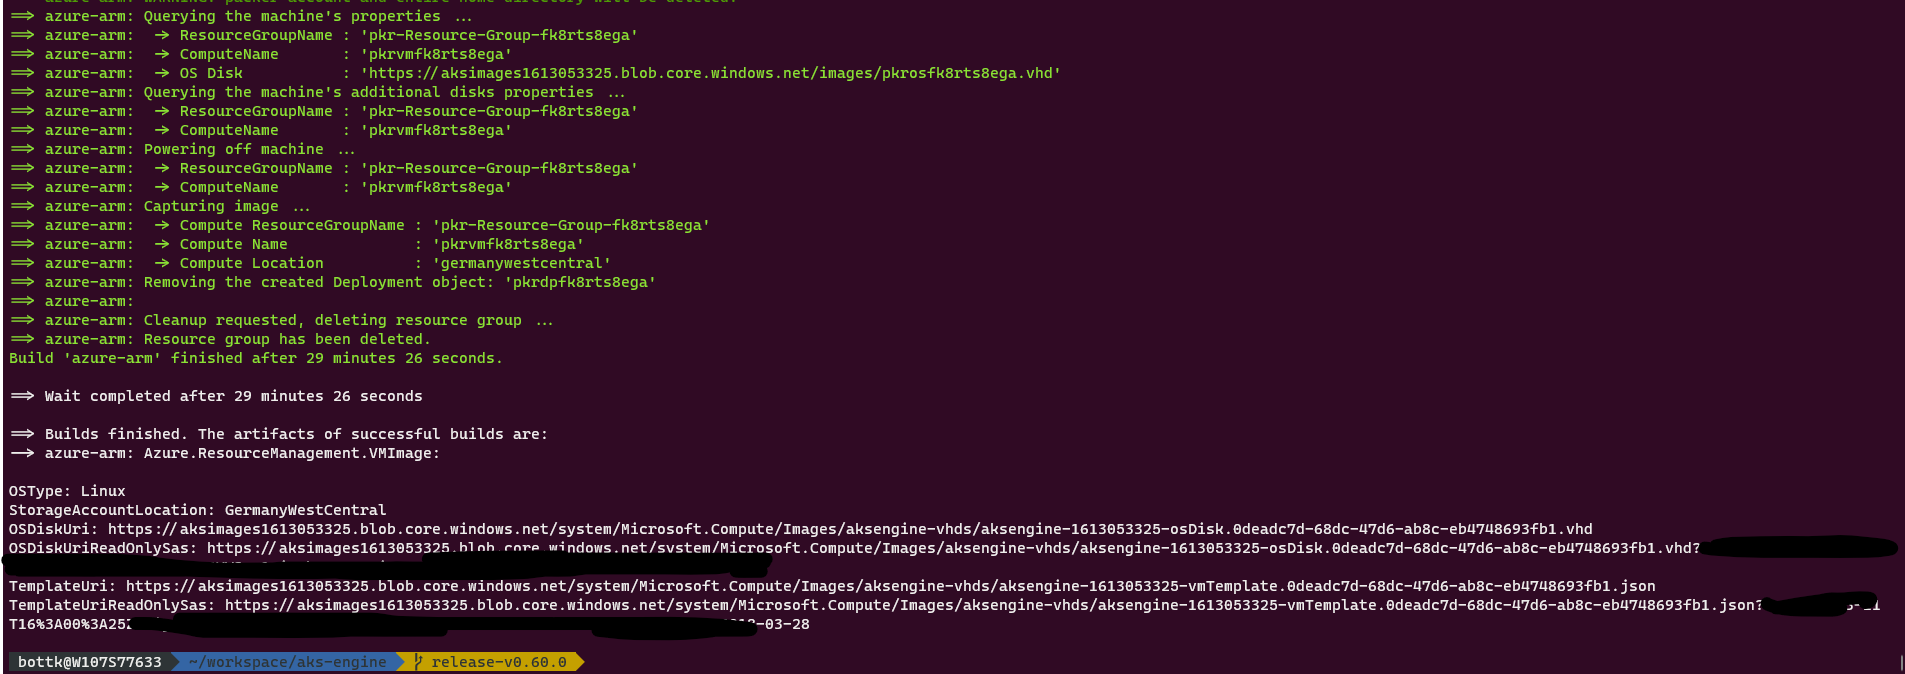
Once the Image has been created, you will be presented with URL’s to download the image / template.
We need the “OSDiskUriReadOnlySas” URL now, as we will use it to add the Image to the AzureStack.

packer-finished

Review your Image SKU from /pkg/api/azenvtypes.go .
For example, for an aks-engine-ubuntu-1804-202007 image:

	AKSUbuntu1804OSImageConfig = AzureOSImageConfig{
		ImageOffer:     "aks",
		ImageSku:       "aks-engine-ubuntu-1804-202007",
		ImagePublisher: "microsoft-aks",
		ImageVersion:   "2021.01.28",
	}

Uploading the Image to AzureStackHub

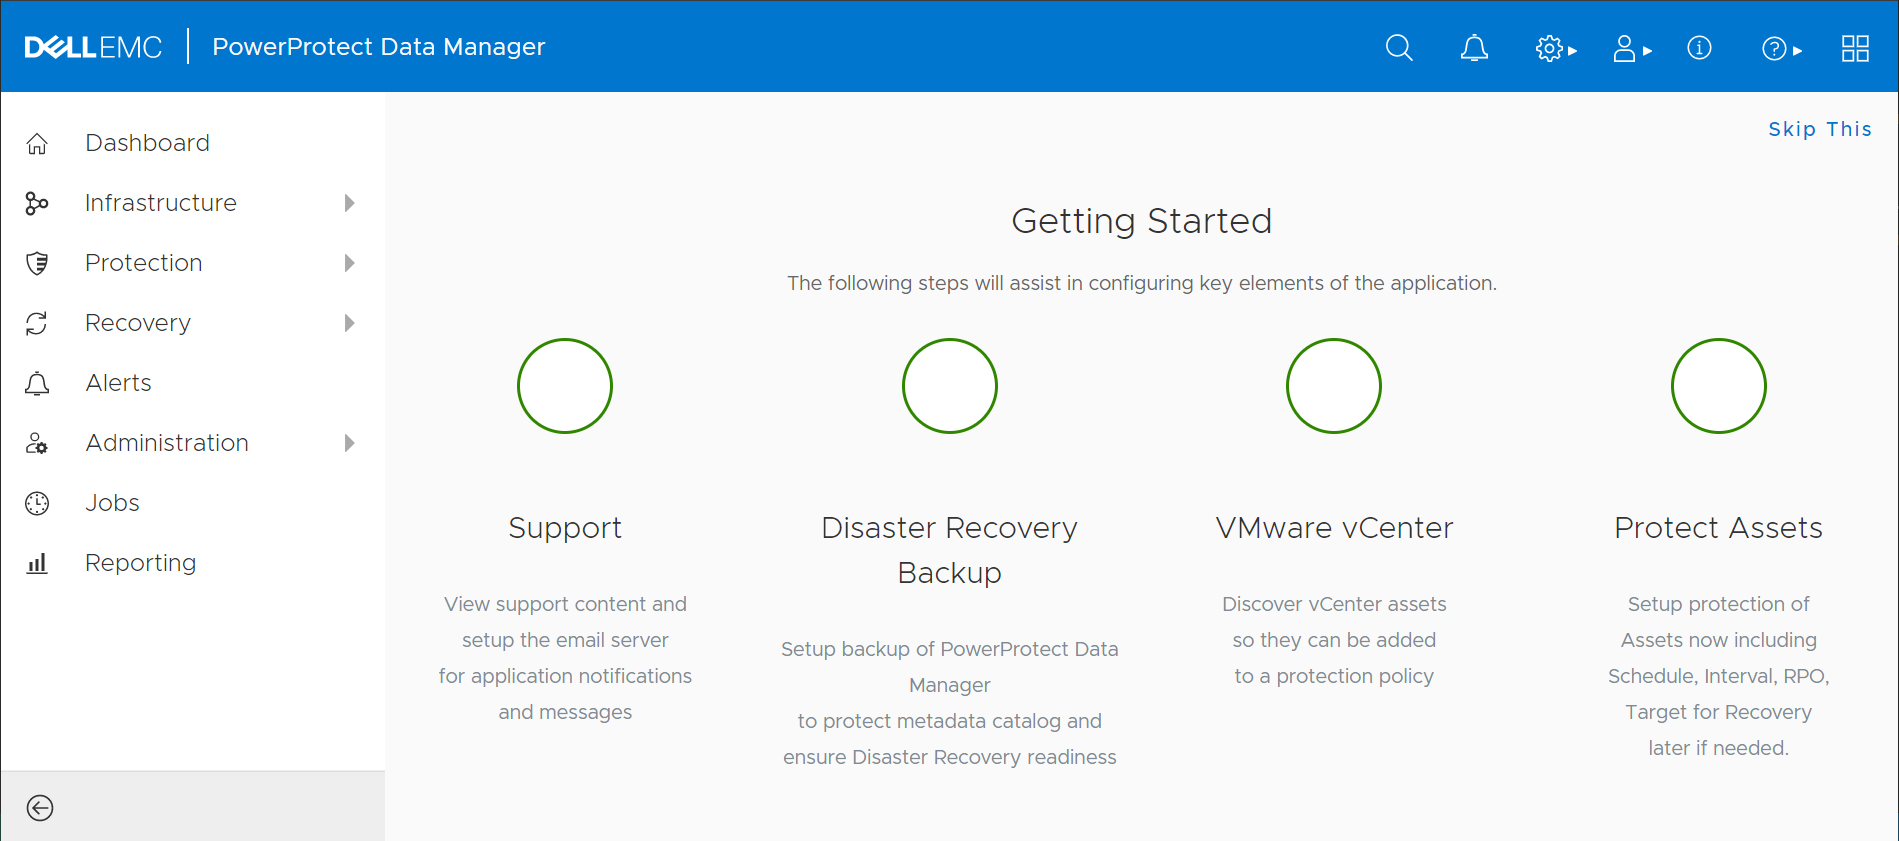
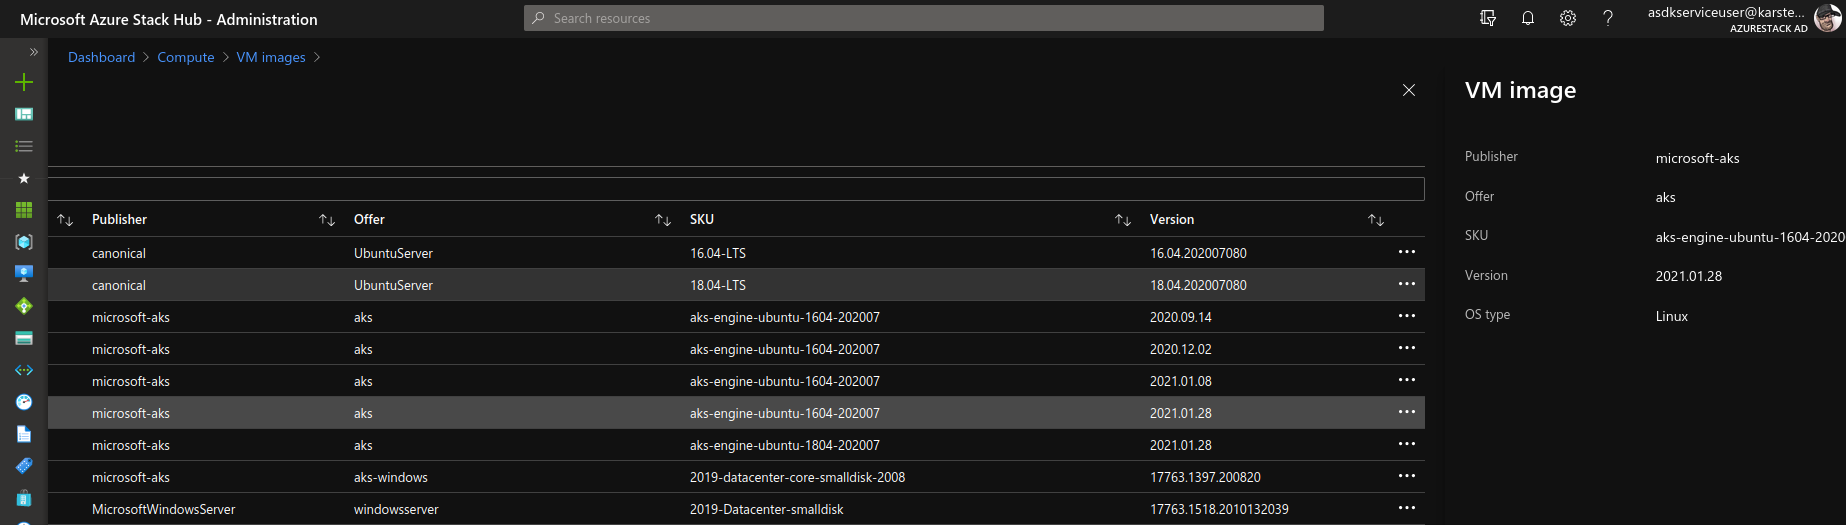
Goto you AzureStackHub AdminPortal. Click on Compute > VM Images > Add to add a new Image.
Fill in the Image Offer/SKU/Publisher/Vesrion for above, and paste the OSDiskUriReadOnlySas in “OS disk blob URi”.

add vm image

It will take a while for the Image Upload to be finished. Once the Image state changed fro creating to succeeded, you are ready to test a new deployment with the aks-engine version you used to build the image.

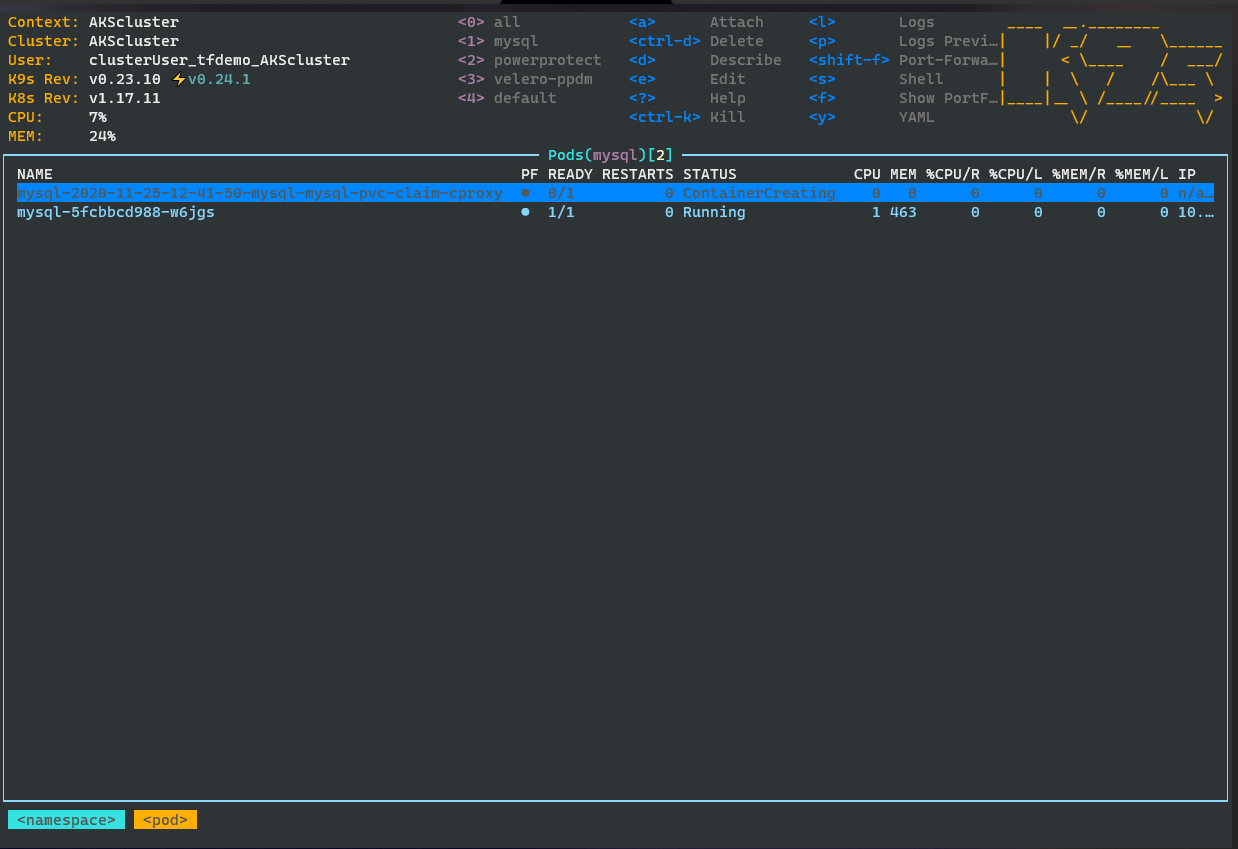
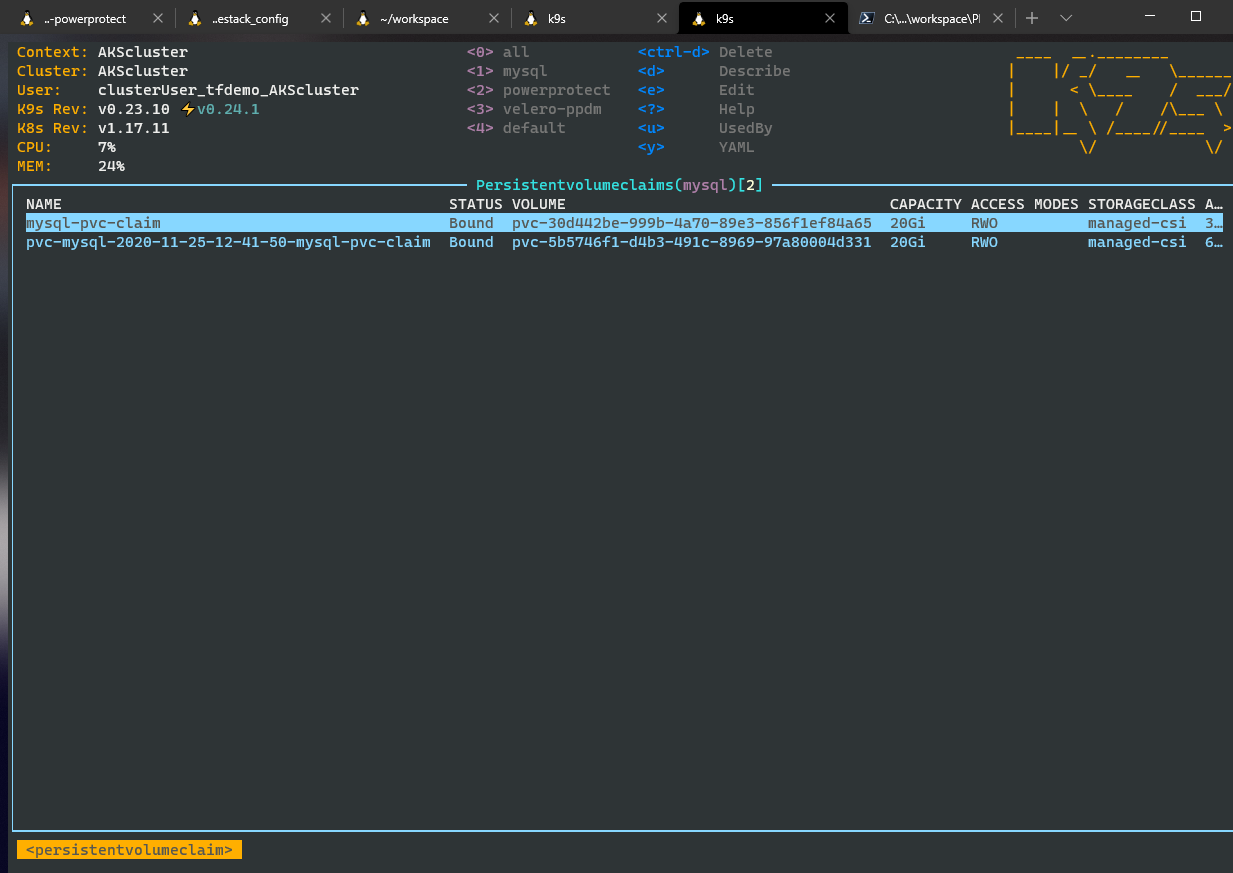
Here are 2 Examples of AKS Nodes running different image sku’s in different Clusters:

For an 16.04, engine v0.55.4 deployed Cluster running K8S v1.17.11:

add vm image

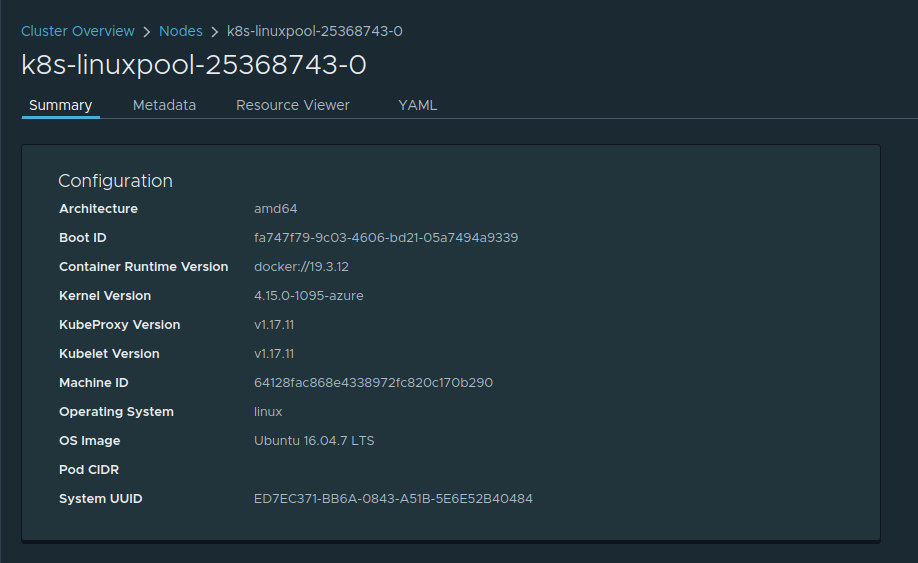
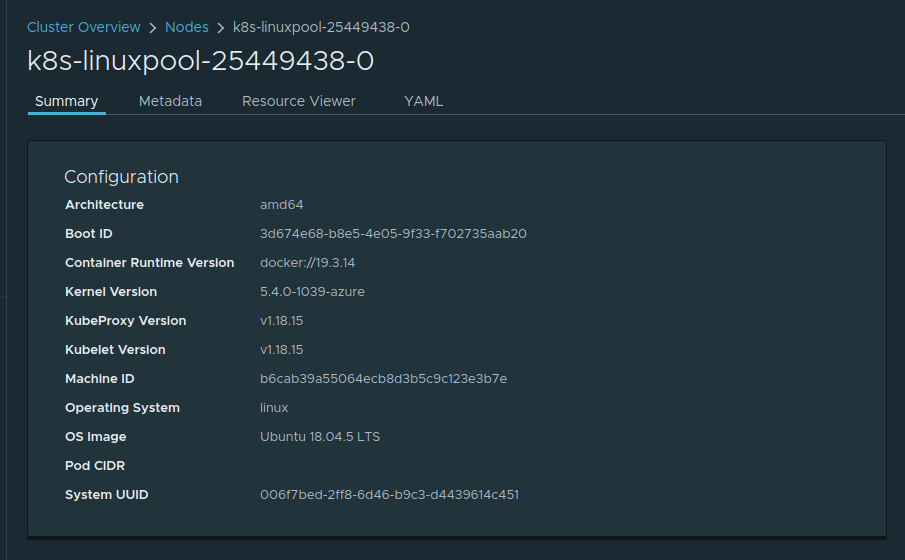
For an 18.04, engine v0.60.0 deployed Cluster running K8S v1.18.15:

add vm image

I am running a lot of different AKS Version in my lab with now issues.
In the configs i am using, i run them with the azure cni and calico deployed.
Happy k8s-ing

Getting Started with Kubernetes AzureDisk CSI Drivers on AzureStack Hub (AKS) Part 1

AzureDisk CSI Drivers on AzureStack Hub (AKS) Part 1

If you have read my previous article, you could get a Brief understanding how we can Protect AKS Persistent Workloads on Azure using @ProjectVelero and DellEMC PowerProtect Datamanager.

Velero and PowerProtect Datamanager Kubernetes Protection depends on the Container Storage Interface (CSI) for persistent Volumes.

We have Successfully qualified Azure AKS against PowerProtect 19.6 with CSI Driver version 0.7.
Having in my mind:
If it runs on Azure, it should run on AzureStack Hub,
I was keen to get CSI run on AzureStack Hub AKS.

Well, we all know, AzureStack Hub is like Azure, but different, so it was a journey …

What works, how it works and what is/was missing

Before we start, let´s get some basics.

What was missing

AzureStack Hub allows you to deploy Kubernetes Clusters using the AKS Engine. AKS Engine is a legacy tool to create ARM Template´s to deploy Kubernetes Clusters.
While Public Azure AKS Clusters will transition to Cluster API ( CAPZ ), AzureStack Hub only support AKS-Engine.
The Current ( officially Supported ) version of AKS-Engine for AzureStack Hub is v0.55.4.

It allows for Persistent Volumes, however, they would use the InTree Volume Plugin.
In order to make use of the Container Storage Interface (CSI), we first would need a CSI Driver that is able to talk to AzureStack Hub.
When I tried to implement the Azure CSI Drivers on AzureStack Hub last year, I essentially failed because of a ton of Certificate and API Issues.

With PowerProtect official Support for Azure, I started to dig into the CSI Drivers again. I browsed through the existing Github Issues and PR´s, and found at least that some People are working on it.

And finally a got in touch with Andy Zhang. who maintains the azuredisk-csi-driver kuberenetes-sigs. From an initial “it should” work, he connected me to the people doing E2E Test for AzureStack Hub.

Within 2 Days turnaround, we managed to fix all API and SSL related issues, and FINALLY GOT A WORKING VERSION !

how it works

I am not going to explain how to deploy AKS-Engine based Clusters on AzureStack Hub, there is a good explanation on the Microsoft Documentation Website.

Once you Cluster is deployed, you need to deploy the latest azuredisk-csi-drivers.

Microsoft Provides a guidance here that helm charts must be used to deploy the azuredisk-csi-drivers on AzureStack Hub.
Here is a Screenshot of the Helmchart from my Kubeapps Dashboard:

CSI Helm CHart

installing the driver

So first we add the Repo from Github:

helm repo add azuredisk-csi-driver https://raw.githubusercontent.com/kubernetes-sigs/azuredisk-csi-driver/master/charts

With the Repo now added, we can now deploy the azuredisk-csi-driver Helm Chart. When doing this, we will pass some setting to the deployment:

  • cloud=AzureStackCloud
    This determines we run on AzureStack Hub and instructs the csi driver to load the Cloud Config from a File on the Master.

  • snapshot.enabled=true
    This installs the csi-snapshot-controller that is required to expose Snapshot Functionality

We deploy the driver with:

helm install azuredisk-csi-driver azuredisk-csi-driver/azuredisk-csi-driver \
--namespace kube-system \
--set cloud=AzureStackCloud \
--set snapshot.enabled=true
installing

This should install: A Replica Set for the csi-azuredisk-controller with 2 Pods containing the following containers:
mcr.microsoft.com/k8s/csi/azuredisk-csi
mcr.microsoft.com/oss/kubernetes-csi/csi-attacher
mcr.microsoft.com/oss/kubernetes-csi/csi-provisioner
mcr.microsoft.com/oss/kubernetes-csi/csi-resizer
mcr.microsoft.com/oss/kubernetes-csi/csi-snapshotter
mcr.microsoft.com/oss/kubernetes-csi/livenessprobe

A Replica Set for the csi-snapshot-controller with 1 Pod:
One csi-azuredisk-node Pod per Node
and the corresponding CRD´s for the snapshotter

you can check the pods with

kubectl -n kube-system get pod -o wide --watch -l app=csi-azuredisk-controller
kubectl -n kube-system get pod -o wide --watch -l app=csi-azuredisk-node

Adding the Storageclasses

When AKS is deployed using the Engine, most likely 3 Storageclasses are installed by the In-Tree Provider:

AKS Storageclasses

In order to make use of the CSI Storageclass, we need to add at least one new Storageclass: create a class_csi.yaml with the following content

---
apiVersion: storage.k8s.io/v1
kind: StorageClass
metadata:
  name: managed-csi
provisioner: disk.csi.azure.com
parameters:
  skuname: Standard_LRS  # alias: storageaccounttype, available values: Standard_LRS, Premium_LRS
reclaimPolicy: Delete
volumeBindingMode: Immediate
allowVolumeExpansion: true

and then run

kubectl apply -f class_csi.yaml

and check with

kubectl get storageclasses

optional: Add a snapshot Class

Similar to the Storage Class, we may want to add a Snaphot Class if we want to clone volumes.
apply the below config with:

kubectl apply -f storageclass-azuredisk-snapshot.yaml
---
apiVersion: snapshot.storage.k8s.io/v1beta1
kind: VolumeSnapshotClass
metadata:
  name: csi-azuredisk-vsc
driver: disk.csi.azure.com
deletionPolicy: Delete
parameters:
  incremental: "false"  # available values: "true", "false" ("true" by default for Azure Public Cloud, and "false" by de
fault for Azure Stack Cloud)

Testing stuff works

Following the Microsoft Documentation, create a Statefulset with Azure Disk Mount:

kubectl create -f https://raw.githubusercontent.com/kubernetes-sigs/azuredisk-csi-driver/master/deploy/example/statefulset.yaml

Verify the deployment with

kubectl -n default describe StatefulSet/statefulset-azuredisk
kubectl get pvc
PVC from CLI

The PVC will show the identical Volume Name as the Disk Name from The Portal / CLI

AKS Storageclasses

You know should have a Running azuredisk-csi-driver Environment on your AzureStack Hub. Stay Tuned for Part 2 including DataProtection with PowerProtect Datamanager …

Protecting AKS Workloads on Azure using Powerprotect Datamanager

Using DELLEMC Powerprotect to Backup and Protect Managed AKS Clusters on Azure

This month we released the new PowerProtect Datamanager 19.6
Along with new and improved feature sets, we also released our first version of PPDM to the Azure Marketplace.

This allows Organizations to Protect the following workloads natively on Azure:

  • Vanilla Kubernetes and AKS
  • Applications (Oracle, SQL, SAP Hana)
  • Windows and Linux FS

Todays Blogpost will focus on the Protection of Managed Azure Kubernetes Service, AKS. We will do so by fisrt Creating Protection Policies and Add Namespace Assts to ist, amd in a second Step add Namespaces automatically from Kubernetes Namespace Labels using Protection Rules

In order to get Started with PPDM on Azure, we will require 2 Solutions to be deployed to Azure:

  • DataDomain Virtual Edition (>= 6.0), DDVE ( AKA PPDD )
  • PowerProtect Datamanager, PPDM

Deployment from Marketplace

Yes, we got you covered. Our Marketplace Temlate Deploys PPDM and PPDD in a One Stop Shopping Experience to your Environment.

Simply Type PPDM into the Azure Search and it directly take you to the Dell EMC PowerProtect Data Manager and Dell EMC PowerProtect DD Virtual Edition Marketplace Item PPDM 19.6 Deployment

PPDM Marketplace Image

The Deployment will only allow you to select validated Machine Types, and will deploy the the DataDomain for using ATOS (Active Tier on Object Store) I am not going into the Details of Basic PPDM od PPDD Configuration, so Please refer to our PowerProtect Data Manager Azure Deployment Guide takes you to all the details you may want/need to configure.

Using CLI ? We got you covered. Simply download the ARM Template using the Marketplace Wizard and you are good to go

You can always get a list of all DELLEMC Marketplace Items using

az vm image list --all --publisher dellemc --output tsv

If you feel like terraforming the above, i have some templates ready in my terraforming DPS main repository to try. They are pretty modular and also covering Avamar and Networker. Feel free to reach out to me on how to use.

Prepare for our First AKS Cluster

assuming you followed the Instructions from the PPDM Deployment Guide, we now will deploy our first AKS Cluster to Azure.

As we are using the Container Storage Interface to protect Persistent Volume Claims, we need to follow Microsoft´s guidance to Deploy Managed AKS Clusters using CSI. See Enable Container Storage Interface (CSI) drivers for Azure disks and Azure Files on Azure Kubernetes Service (AKS) (preview) for details.

AKS Cluster using CSI must be deployed from AZ CLI as the Date of this article.

If this is the first AKS Cluster using CSI in your Subscription, you will need to enable the feature using:

az feature register --namespace "Microsoft.ContainerService" \
 --name "EnableAzureDiskFileCSIDriver"

You can query the state using:

az feature list -o table \
--query "[?contains(name, 'Microsoft.ContainerService/EnableAzureDiskFileCSIDriver')].{Name:name,State:properties.state}"

Once finished, we register the Provider with:

az provider register --namespace Microsoft.ContainerService

But we also need to update our AZ CLI to support the latest extensions for AKS. Therefore, run:

az extension add --name aks-preview
az extension update --name aks-preview

Deploy the AKS Cluster

Deploying the AKS Cluster creates a Service Principal in the Azure AD on every run. You might want to use the same Service Principal again for Future Deployments, or Cleanup the SP after ( as it will not be deleted from AzureAD ).

If not already done, login to Azure from AZ CLI. Two Method´s, depending on your Workflow:

Using Device Login (good to Create the SP for RBAC):

az login --use-device-code --output tsv

Using a limited Service Principal, with already configured SP for AKS:

AZURE_CLIENT_ID=<your client id>
AZURE_CLIENT_SECRET=<your secret>
AZURE_TENANT_ID=<your Tenant ID>
az login --service-principal \
    -u ${AZURE_CLIENT_ID} \
    -p ${AZURE_CLIENT_SECRET} \
    --tenant ${AZURE_TENANT_ID} \
    --output tsv

So we are good to create our first AKS Cluster.
Make sure you are scoped to the correct Subscription:

RESOURCE_GROUP=<your AKS Resource Group>
AKS_CLUSTER_NAME=<your AKS Cluster>
AKS_CONFIG=$(az aks create -g ${RESOURCE_GROUP} \
  -n ${AKS_CLUSTER_NAME} \
  --network-plugin azure \
  --kubernetes-version 1.17.11 \
  --aks-custom-headers EnableAzureDiskFileCSIDriver=true \
  --subscription ${AZURE_SUBSCRIPTION_ID} \
#  --node-vm-size ${AKS_AGENT_0_VMSIZE} \
#  --service-principal ${AKS_APP_ID} \ <-- this when using 
#  --client-secret ${AKS_SECRET} \ <-- this for using client secret
#  --vnet-subnet-id "/subscriptions/${AZURE_SUBSCRIPTION_ID}/resourceGroups/${RESOURCE_GROUP}/providers/Microsoft.Network/virtualNetworks/${RESOURCE_GROUP}-virtual-network/subnets/${RESOURCE_GROUP}-aks-subnet"  \ # <-- this when using existing subnet
  --generate-ssh-keys
)

Once the deployment is done, we can get the Kubernetes Config for kubectl using:

az aks get-credentials --resource-group ${RESOURCE_GROUP} --name ${AKS_CLUSTER_NAME}
Get AKS Cluster Credentials

In order to use Snapshots with the CSI Driver, we need to deploy the Snapshot Storageclass:

kubectl apply -f https://raw.githubusercontent.com/kubernetes-sigs/azuredisk-csi-driver/master/deploy/example/snapshot/storageclass-azuredisk-snapshot.yaml

With that, the Preparation for AKS using CSI is done. You can view your new StorageClasses with:

kubectl get storageclasses
CSI Storage Classes

Add Kubernetes Secret for PPDM

In order to connect to AKS from PPDM, we need to create Service Account with Role based access. A basic RBAC Template can be applied with:

kubectl apply -f  https://raw.githubusercontent.com/bottkars/dps-modules/main/ci/templates/ppdm/ppdm-admin.yml
kubectl apply -f  https://raw.githubusercontent.com/bottkars/dps-modules/main/ci/templates/ppdm/ppdm-rbac.yml

After, you can export the Token to be used for PPDM with:

kubectl get secret "$(kubectl -n kube-system get secret | grep ppdm-admin | awk '{print $1}')" \
-n kube-system --template={{.data.token}} | base64 -d

This is needed for the Credentials we Create in PPDM
Now sign in to PPDM and go to Credentials:

Credentials

Add a Credential of Type Kubernetes, with the name of the secret we created in AKS, in the example it is ppdm-admin.
Copy the Service token in you got from above:

PPDM Credentials AKS

Add AKS Cluster to PPDM

Now we are good to add the new AKS Cluster to PPDM. Therefore, we go to the new Asset Sources Dashboard in PPDM:

Enable Asset Sources

Click on the Kubernetes Source to enable Kubernetes Assets. After clicking OK on the Instructions, click Add on the Kubernetes

Fill in the Information for your AKS Cluster, and use the ppdm-admin Credentials:

Add AKS Cluster

Click on Verify Certificate to import the AKS API Server:

Verify Certificate

Then Click save to add the AKS Cluster. The AKS Cluster will be discovered automatically for us now, so go over to Assets:

AKS Assets

You will see that 2 new Namespaces have been deployed, velero-ppdm and powerprotect. We are leveraging upstream velero and added support for DataDomain Boost Protocol.

In my example, i already added a mysql application using the Storageclass managed-csi for PV Claim, you can use my Template from here:

NAMESPACE=mysql
kubectl apply -f https://raw.githubusercontent.com/bottkars/dps-modules/main/ci/templates/mysql/mysql-namespace.yaml
kubectl apply -f https://raw.githubusercontent.com/bottkars/dps-modules/main/ci/templates/mysql/mysql-secret.yaml --namespace ${NAMESPACE}
kubectl apply -f https://raw.githubusercontent.com/bottkars/dps-modules/main/ci/templates/mysql/mysql-pvc.yaml --namespace ${NAMESPACE}
kubectl apply -f https://raw.githubusercontent.com/bottkars/dps-modules/main/ci/templates/mysql/mysql-deployment.yaml --namespace ${NAMESPACE}

You can verify the Storage Class in PPDM by cliking on the “exclusions” link form the namespace vie in PPDM:

Storage Class in PPDM

We now can create a Protection Policy. Therefore, go to Protection –> Protection Policies, and click Add to add your first policy

The step is similar to all other Protection Policy. Make sure to select

  • Type Kubernetes
  • Purpose Crash Consistent
  • Select the Asset ( Namespace ) with the Managed CSI
  • Add at least a Schedule for Type Backup
Protection Policy Detail

Once done, monitor the System Job to finish Configuring the Protection Policy:

System Job

We can now start our First Protection by clicking Backup Now on the Protection Policy:

Backup Now

Once the Backup Kicked in, you can monitor the job by viewing the Protection Jon from the Jobs Menu:

Backup Now

As a Kubernetes User, you can also use your favorite Kubernetes tools to monitor what is happening behind the Curtains.

In you Application namespace ( here, mysql ), PowerProtect will create a “c-proxy”, which is essentially a datamover to claim the Snapshot PV: I am using K9s to easy dive into Pods and Logs:

Claim Proxy

kubectl command:

kubectl get pods --namespace mysql

A PVC will be created for the MYSQL Snapshot. You can verify that by viewing the PVC´s:

PVC List

kubectl command:

kubectl get pvc --namespace mysql

See the details of the snapshot claiming by c-proxy:

claimed Snapshot

kubectl command:

kubectl describe pod/"$(kubectl get pod --namespace mysql  | grep cproxy | awk '{print $1}')" --namespace mysql

You can Browse your Backups now from PPDM UI by selecting assets –> Kubernetes Tab –> --> copies

Asset Copies

Also, as a Kubernetes User, you can use the
kubectl command :

kubectl get backupjobs -n=powerprotect
kubectl describe backupjobs/<you jobnumber> -n=powerprotect
Describe Backup Jobs

Automated Protection using Namespace Labels

One of the great features is the Automated Asset Selection for Kubernetes Assets using Namespace Labels. In the Previous Example we have created a Protection Policy and added a Kubernetes Namespace Asset to it. to be protected. No we are adding K8S assets automatically by using Protection Rules and Kubernetes Labels.

For that, we select Protection Rules on PPDM. On the Kubernetes Tab, we click on add to create a new Rule. Select your existing Policy and Click on Next. Configure an Asset filter with

  • Field: Namespace Label Includes in my example I am using the Label *ppdm_policy=ppdm_gold*
Asset Filters

Now we need to create the Namespace and an Application I use a Wordpress deployment in my example. For this, create a new Directory on your machine and change into it Create the Namespace template:

NAMESPACE=wordpress
PPDM_POLICY=ppdm_gold
cat <<EOF >./namespace.yaml
apiVersion: v1
kind: Namespace
metadata:
  name: ${NAMESPACE}
  labels: 
    ppdm_policy: ${PPDM_POLICY}
EOF

Create a Kustomization File:

WP_PASSWORD=<mysecretpassword>
cat <<EOF >./kustomization.yaml
secretGenerator:
- name: mysql-pass
  literals:
  - password=${WP_PASSWORD}
resources:
  - namespace.yaml  
  - mysql-deployment.yaml
  - wordpress-deployment.yaml

Download my Wordpress Templates:

wget https://raw.githubusercontent.com/bottkars/dps-modules/main/ci/templates/wordpress/mysql-deployment.yaml
wget https://raw.githubusercontent.com/bottkars/dps-modules/main/ci/templates/wordpress/wordpress-deployment.yaml

with the 4 files now in place, we can run the Deployment with:

kubectl apply -k ./ --namespace ${NAMESPACE}

i am using a Concourse Pipeline to do the above, but your out may look similar:

Deploy Wordpress

We can Verify the Namespace from K9s /kubectl/azure Now we need to go to you PPDM and manually re-discover the AKSCluster. (default every 15 Minutes) Once done, we go to Protection –> Protection Rules and manually run the Protection Rule we created earlier:

Rule Assigned

After Running, the new Asset is Assigned to the Protection Policy We now can go to our Protection Policy, and the Asset Counted should include the new Asset. You can Click edit to see / verify Wordpress has been Added :

Edit Assets

The “Manage Exclusions” link in PVC´s Excluded Column will show you the PVC´s in the Wordpress Asset. It should be 2 PVC´s of type managed-csi:

Included PVC´s

Run the Protection Policy as before, but now only select the New Asset to be Backed up:

Backup Now

Troubleshooting

Backups fail

In case your Backups fail, redeploy the powerprotect-controller by deleting the POD:

kubectl delete pod "$(kubectl get pod --namespace powerprotect  | grep powerprotect-controller | awk '{print $1}')" --namespace powerprotect
The Art of Possible: PowerProtect Datamanager Automation

Deploying PowerProtect Datamanager (PPDM) to vSphere using govc and Powershell

when it comes to deploy Powerprotect Datamanger, we have a variety of options, for example

  • Terraform
  • Ansible
  • OVA deployment from vCenter UI
  • Saltstack
  • bash / Concourse just to name few. In this Post I focus on a Powershell Deployment leveraging mware govc and my PPDM Powershell Module. Other Method´s will follow here over the next Couple of Days . . .

Requirements

Before we start the deployment, we need to check that we have

  • govc >= 0.23 insalled from Github Releases installed in a path as govc
  • my Powershell modules ( minimum : 0.19.6.2 ) for PPDM installed from PPDM Powershellusing
install-module PPDM-pwsh -MinimumVersion 0.19.6.2

Step 1: Connecting to vSphere using govc

From a Powershell, we first need to connect to our vSphere Virtual Center By using the following code, we can securely create a connection:

# Set the Basic Parameter
$env:GOVC_URL="vcsa1.home.labbuildr.com"    # replace ith your vCenter
$env:GOVC_INSECURE="true"                   # allow untrusted certs
$env:GOVC_DATASTORE="vsanDatastore"         # set the default Datastore 
# read Password
$username = Read-Host -Prompt "Please Enter Virtual Center Username default (Administrator@vsphere.local)"
If(-not($username)){$username = "Administrator@vsphere.local"}
$SecurePassword = Read-Host -Prompt "Enter Password for user $username" -AsSecureString
$Credentials = New-Object System.Management.Automation.PSCredential($username, $Securepassword)
#Set Username and Password in environment
$env:GOVC_USERNAME=$($Credentials.GetNetworkCredential().username)
$env:GOVC_PASSWORD=$($Credentials.GetNetworkCredential().password)
govc about

Step 2: deploying Powerprotect Datamanager ova using govc from Powershell

  • Requirement: download the latest Powerprotect DataManager from DELLEMC Support ( login required )

first of all, we set our govc environment to have the Following Variables ( complete code snippet of step 2 below )

# Set the Basic Parameter
$env:GOVC_URL="vcsa1.home.labbuildr.com"                # replace ith your vCenter
$env:GOVC_INSECURE="true"                               # allow untrusted certs
$env:GOVC_DATASTORE="vsanDatastore"                     # set the default Datastore 
$ovapath="$HOME/Downloads/dellemc-ppdm-sw-19.6.0-3.ova" # the Path to your OVA File
$env:GOVC_FOLDER='/home_dc/vm/labbuildr_vms'            # the vm Folder in your vCenter where the Machine can be found
$env:GOVC_VM='ppdm_demo'                                # the vm Name
$env:GOVC_HOST='e200-n4.home.labbuildr.com'             # The target ESXi Host or ClusterNodefor Deployment
$env:GOVC_RESOURCE_POOL='mgmt_vms'                      # The Optional Resource Pool

We then can connect to our vSphere Environment:

# read Password
$username = Read-Host -Prompt "Please Enter Virtual Center Username default (Administrator@vsphere.local)"
If(-not($username)){$username = "Administrator@vsphere.local"}
$SecurePassword = Read-Host -Prompt "Enter Password for user $username" -AsSecureString
$Credentials = New-Object System.Management.Automation.PSCredential($username, $Securepassword)
#Set Username and Password in environment
$env:GOVC_USERNAME=$($Credentials.GetNetworkCredential().username)
$env:GOVC_PASSWORD=$($Credentials.GetNetworkCredential().password)
govc about

then we need to import the Virtual Appliance Specification from the ova using govc import.spec the command would look like

$SPEC=govc import.spec $ovapath| ConvertFrom-Json

Once we have the Configuration Data, we will change the vami keys in the “Property Mappings” to our desired Values

# edit your ip address
$SPEC.PropertyMapping[0].Key='vami.ip0.brs'
$SPEC.PropertyMapping[0].Value='100.250.1.123' # < your IP here
# Default Gateway
$SPEC.PropertyMapping[1].Key='vami.gateway.brs'
$SPEC.PropertyMapping[1].Value = "100.250.1.1" # < your Gateway here
# Subnet Mask               
$SPEC.PropertyMapping[2].Key = "vami.netmask0.brs"
$SPEC.PropertyMapping[2].Value = "255.255.255.0" # < your Netmask here
# DNS Servers
$SPEC.PropertyMapping[3].Key = "vami.DNS.brs"
$SPEC.PropertyMapping[3].Value = "192.168.1.44" # < your DNS Server here
# you FQDN, make sure it is resolvable from above DNS
$SPEC.PropertyMapping[4].Key = "vami.fqdn.brs"
$SPEC.PropertyMapping[4].Value = "ppdmdemo.home.labbuidr.com" # < your fqdn here   

Now we need to import the OVA using govc import.ova with the settings we just created:

$SPEC | ConvertTo-Json | Set-Content -Path spec.json
govc import.ova -name $env:GOVC_VM -options="./spec.json" $ovapath

And change to the Correct “VM Network” for ethernet-0

govc vm.network.change -net="VM Network" ethernet-0

Now, we can Power on the vm using govc vm.power

govc vm.power -on $env:GOVC_VM
connect_vc.ps1

… and wait for the Powerprotect Datamanager Services to be up and running.

In an Automated Scenario, one could query the URL http://fqdn.of.ppdm:443/#/fresh until receiving a 200 ok message from the Webserver ( see below script listing)

Step 3: Configure PPDM using PPDM-pwsh

if not already node, load the Modules by

import-module PPDM-pwsh

The first step is to connect to the PPDM API. You will be asked for for the username ad admin and Password of admin We will retrieve a Bearer Token from the API, that will be used automatically for Subsequent requests in the Current Powershell Session. PPDM-pwsh also will figure out your Powershell Version and therefore use different Methods to use non trusted certificates. ( -trustCert)

$API=Connect-PPDMapiEndpoint -PPDM_API_URI https://ppdm-demo.home.labbuildr.com -user -trustCert

Once connected, we need to Accept the EULA for PPDM by using

Approve-PPDMEula

The next step is to configure PPDM. For that, we need to specify Timezone, NTP Server and the new Password(s) to get a list of timezones, run

Get-PPDMTimezones

In our example, we use Europe/Berlin. Configuring the PPDM does only require 3 Parameters:

  • Timezone
  • Initial Password(s)
  • a List of NTP Sever(s)

We can use a Single Powershell Command to start the COnfiguration Process:

Set-PPDMconfigurations -NTPservers 139.162.149.127 -Timezone "Europe/Berlin" -admin_Password 'Password123!'
set-ppdmconfigurations

It will take up to 10 Minutes for PPDM to finish. We can Monitor the Success Status with

 Get-PPDMconfigurations | Get-PPDMconfigstatus

In an Automation, we would wait for percentageCompleted -eq 100

config success

You can now visit the PPDM Homepage from your Webbrowser to configure DataDomain, add a vCenter, add Kubernetes Clusters and more. In my next Post we will do so as well from Powershell … stay tuned

config success

Script listings:

Connect Virtual Center:

Deploy PPDM:

Wait for Webservice:

configure PPDM:

deploy and run Harbor Container Registry as VM on Azurestack for AKS

arm template for Harbor Contaimer Registry Project Harbor

this is an explanation of my ARM template for Harbor Container Registry. For details on Harbor head over to Project Harbor .

The Template will deploy an Ubuntu 18.04 VM with Docker Engine and Harbor the official from GitHub Repo. You can opt to have selfsigned certificates created automatically for you OR use custom Certificates form you CA.

Before we start the deployment, wi need to check that we have

  • a ssh Public Key in Place ( i default to ~/.ssh/id_rsa.pub in my code samples)
  • connection to AzureStack from AZ CLI
  • Ubuntu 18.04 LTS Marketplace Image on Azurestack
  • Custom Script Extension for Linux on Azurestack
  • internet connection to dockerhub, canonical repo´s and GitHub

in the following examples, i deploy 2 Registry, 1 called devregistry with self-signed Certificates, and one called registry, to become my Production Registry using let´s encrypt Certificates

Testing Deployment and Parameters

first we need to a variable before we start or Test the Deployment. The Variable DNS_LABEL_PREFIX marks the external hostname for the VM and will be registered with Azurestack´s DNS, eg DNS_LABEL_PREFIX.location.cloudapp.dnsdomain

DNS_LABEL_PREFIX=devregistry # this should be the azurestack cloudapp dns name , e.g. Harbor, Mandatory

The name will also be used in the Generated Certificate for Self Signed Certs

If you are deploying using you own Certificates, you will also have provide you external hostname the Harbor Registry will use and you created your Certificate for: (i am using a wildcard Cert for my domain here)

EXTERNAL_HOSTNAME=registry.home.labbuildr.com #external dns name

you can validate you deployment with:

for Self Signed

DNS_LABEL_PREFIX=devregistry # this should be the azurestack cloudapp dns name , e.g. Harbor, Mandatory
az group create --name ${DNS_LABEL_PREFIX:?variable is empty} --location local
az deployment group validate --resource-group ${DNS_LABEL_PREFIX:?variable is empty} \
    --template-uri "https://raw.githubusercontent.com/bottkars/201-azurestack-harbor-registry/master/azuredeploy.json" \
    --parameters \
    sshKeyData="$(cat ~/.ssh/id_rsa.pub)" \
    HostDNSLabelPrefix=${DNS_LABEL_PREFIX:?variable is empty}

note: i am using an inline variable check with :? do validate the variables are set. this is one of my best practices to not pass empty values to Parameters that are not validated / are allowed to be empty.

validate_devregistry

for user Provided Cerificates

for user provided Certificate, you also need to provide your

  • hostCert, the Cerificate content of you Host or Domain Wildcard Cert
  • certKey, the content of the matching Key for the above Certificate and, if your registry is not one of the Mozilla trusted registries,
  • caCert, the Certificate content of you root ca for the docker engine Un my Example, i use Let´s enrypt acme Certs and pass them via bash cat inline. Make sure to use Hyphens as the Certificates are Multiline values:
DNS_LABEL_PREFIX=registry #dns host label prefix 
EXTERNAL_HOSTNAME=registry.home.labbuildr.com #external dns name
az group create --name ${DNS_LABEL_PREFIX:?variable is empty} --location local
az deployment group validate --resource-group ${DNS_LABEL_PREFIX:?variable is empty}\
    --template-uri "https://raw.githubusercontent.com/bottkars/201-azurestack-harbor-registry/master/azuredeploy.json" \
    --parameters \
    sshKeyData="$(cat ~/.ssh/id_rsa.pub)" \
    HostDNSLabelPrefix=${DNS_LABEL_PREFIX:?variable is empty} \
    caCert="$(cat ~/workspace/.acme.sh/home.labbuildr.com/ca.cer)" \
    hostCert="$(cat ~/workspace/.acme.sh/home.labbuildr.com/home.labbuildr.com.cer)" \
    certKey="$(cat ~/workspace/.acme.sh/home.labbuildr.com/home.labbuildr.com.key)" \
    externalHostname=${EXTERNAL_HOSTNAME:?variable is empty}
validate_registry

If there are no errors from above commands, we should be ready to start the deployment

starting the Deployment

start deployment for selfsigned registry

az deployment group create --resource-group  ${DNS_LABEL_PREFIX:?variable is empty} \
    --template-uri "https://raw.githubusercontent.com/bottkars/201-azurestack-harbor-registry/master/azuredeploy.json" \
    --parameters \
    sshKeyData="$(cat ~/.ssh/id_rsa.pub)" \
    HostDNSLabelPrefix=${DNS_LABEL_PREFIX:?variable is empty}
create_devregistry_deployment

start the deployment for registry using your own CA Certs:

az deployment group create --resource-group ${DNS_LABEL_PREFIX:?variable is empty}\
    --template-uri "https://raw.githubusercontent.com/bottkars/201-azurestack-harbor-registry/master/azuredeploy.json" \
    --parameters \
    sshKeyData="$(cat ~/.ssh/id_rsa.pub)" \
    HostDNSLabelPrefix=${DNS_LABEL_PREFIX:?variable is empty} \
    caCert="$(cat ~/workspace/.acme.sh/home.labbuildr.com/ca.cer)" \
    hostCert="$(cat ~/workspace/.acme.sh/home.labbuildr.com/home.labbuildr.com.cer)" \
    certKey="$(cat ~/workspace/.acme.sh/home.labbuildr.com/home.labbuildr.com.key)" \
    externalHostname=${EXTERNAL_HOSTNAME:?variable is empty}
create_registry_deployment

validation / monitoring the installation

You can monitor the deployment in the Azurestack User Portal. The Resource group will be the name of the DNS_LABEL_PREFIX

harbor_rg

once the Public IP is online, you can also ssh into the Harbor host to monitor the Custom Script execution:

ssh ubuntu@${DNS_LABEL_PREFIX:? variable empty}.local.cloudapp.azurestack.external
validate_host_logs

there are 2 logs on the Harbor host that you may want to examine

  • install.log, the log file of the custom script installer
  • ~/conductor/logs/deploy_harbor.sh.*.log, the log file of my harbor deployment

the installation should be successful one you see ✔ ----Harbor has been installed and started successfully.----

harbor_log

Testing the Registry

Logging into UI

First we log in to our Registry. For the DevRegistry, use you Browser and just browse to https://devregistry.local.cloudapp.azurestack.external (replace with you Azurestack region and Domain)

Chrome Users: as we use a selfsigned cert, you might want to type thisisunsafe in the Browserwindow.

The Login for the registry is : username: admin ( if not changed in the deployment Parameter) password: Harbor12345 ( i recommend changing the password, as the Password is in cleartext in the Harbor installation template)

If you are using your own CA and specified a different EXTERNAL_HOSTNAME you might need to create a DNS A Record pointing to your Harbors external IP Address

logging in and pushing an image from docker cli

To login from docker CLI it might me necessary to put the ROOT ca in dockers /etc/docker/certs.d directory. On the Harbor Host, my custom installer has done this already for you:

ls /etc/docker/certs.d/registry.home.labbuildr.com/ca.crt

for Kubernetes Clusters, the same rule applies. I have created a DaemonSet for my Kubernetes Deployments, more on that in my next post.

you can test the login with

docker login -u admin -p Harbor12345

once logged in, we can try to tag one of the local docker images for our registry:

docker images
docker tag goharbor/harbor-core:v1.10.1 registry.home.labbuildr.com/library/harbor-core:v1.10.1
docker push registry.home.labbuildr.com/library/harbor-core:v1.10.1

Note: the default Project on our Harbor registry is called library, you can create Procects for your needs using Harbor UI or API.

docker_push

You can verify the Image Push Operation by Browsing to the Library from the UI:

goharbor

The template is currently available on my Git Repo: bottkars GiT